


There are several means to include texture to your jewelry – burrs, files and waxes are examples of techniques that add deep and pronounced texture to when simple surfaces.
Below we are heading to exhibit you a couple of brief and simple approaches to insert texture utilizing a selection of polishing applications, together with our favourite the Garryflex.
Action 1:
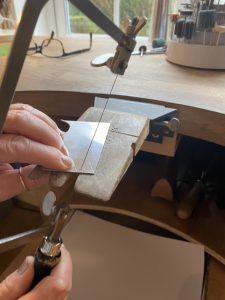
To clearly show illustrations of a couple of different textures we have reduce out triangles to make into blend and match studs.
Mark out the dimensions of your triangles onto the metal working with a scribe. Lower out making use of your piercing saw, sawing on the outdoors of the line to go away home for submitting or sanding later on. Also, keep in mind to continue to keep that blade lubricated! We advise acquiring a block of wax screwed to your bench, effortless to hand, to guarantee your blade stays lubricated.
Sanding
You will need to give by yourself a excellent clean tidy foundation to operate with, texture will not disguise any marks or scratches and can highlight them even additional. If you cut corners you will have to go again and resolve it later on, so it’s far better to get it right at this phase to stay clear of heading back and commencing all in excess of once again!
Operate by means of the emery papers, from 150 grit to 1,200 grit. At each individual stage guarantee all your scratches have gone from the prior grit right before going onto the up coming. If you have items that are the identical dimensions, sandwich almost everything with each other with a smaller total of superglue and sand the edges all at as soon as to save time

Step 2:
Now it’s time to texture. Right here are just a several of the numerous distinctive textures you can create…
No 1
Garryflex – coarse
Garryflex is helpful, but swift and easy to use. Simply include texture using any motion you like, linear, circles or crosshatch. We have utilised a gentle tension with a flicking motion in random instructions to attain a raw edgy scratched appear.

No 2
Frosting wheel – Yellow
Knife edge rubber wheel – Black
For starters, don’t forget to safeguard your self as these frosting wheels can be perilous. Have on security goggles and shield your fingers. Hold modest pieces in pliers to enable for a excellent grip and maintain your fingers out of harms get to (You can also keep your piece in a ring clamp). Texture the total area with the frosting wheel utilizing slow backwards and forwards movements. Future, I have additional some stripes employing the coarse black knife edge rubber wheel. Try and keep this straight and repeat a pair of moments right up until you get the required depth to generate a amazing distinction involving the stripes and the shimmery texture.

No 3
Nylon Abrasive wheel
Nylon Abrasive wheels presents a charming matt end. To give the piece desire use liner actions overlapping in a crisscross pattern.

No 4
White added coarse knife edge rubber wheel
Applying the edge of the wheel produce minor lined divots that go in random instructions and overlap, so the complete surface is filled but not also deeply, just adequate to see the pattern. This makes a really interesting result with added depth.

No 5
Matt ending abrasive wheel
Basically move the wheel in only 1 direction to produce a pretty linear and refined satin finish.

No 6
Frosting wheel – Green
Covering the entire area, use straight even movements and repeat the system to emphasise the element even further. This is the coarsest of the frosting wheels and provides a truly shimmery finish

Move 3:
Soldering the posts
Assure the backs of the triangles are clear, free of charge from dust and finger prints by supplying a fast rub with 1,200 grit emery paper to make it possible for the solder to stream quickly. Line up your triangles on your soldering block and include a tiny amount of money of flux to the area where by the publish will be positioned. You can measure and mark the point with a scribe or by eye.
Warmth the solder pallions and scoop them onto the posts and then bring the publish above to the piece, warmth the piece and solder on the article. (You can also sweat solder the solder to the earring initial and then increase the post if you favor). Quench in drinking water and put in the pickle.

Phase 4:
Closing polish
At the time out of the pickle the backs may want a bit of a cleanse-up. We suggest pink scotchbrite radial discs, which will clean up nicely without having harmful the thoroughly clean-up you did prior to pickling. If the fronts have to have a bit of consideration, top rated up some textures or flippantly polish any regions you would like to “pop” with a delicate wool mop and rouge

And there you have some tiny textured studs to combine and match. There is so numerous textures you can make utilizing various resources, so have a play around and see what you make. Usually recall to continue to be safe by putting on the correct PPE – love!

We want to know what you have been making! Share your creations with us on social media, tagging in Cooksongold on Fb, Twitter and Instagram

Zoe Jane Jewelry
Loving to experiment and delve into a variety of processes, I incorporate both of those modern day and regular approaches. These consist of lost wax casting, stone in location casting, delft clay casting and the ancient art of granulation.

Just about every unique piece is personally handmade by me in my studio on the magnificent Essex/Suffolk border, together with my 7 cat helpers.
More Stories
A Fantastic History and Series of Exciting Developments Beckon the Evolution of Jewellery
A History Of Contemporary Jewellery
Benefits of Buying Pure Silver Indian Jewellery Online